Custom code
- 22 Oct 2024
- 5 Minutes to read
- Contributors

- Print
- DarkLight
Custom code
- Updated on 22 Oct 2024
- 5 Minutes to read
- Contributors
- Print
- DarkLight
Article summary
Did you find this summary helpful?
Thank you for your feedback!
Disclaimer
Custom code is based on TypeScript and fully replaces the (now deprecated) CustomJS projects.
It provides all the features from CustomJS in a more sophisticated manner.
With custom code you can extend your configurators capabilities in many ways. It allows you to write TypeScript which then runs in your configurator.
The following are just a few examples of the countless possibilities which open up with this feature:
- Extend functionalities for existing components and controls (see custom code utils)
- Extend functionalities for the viewer control (see 3d viewer)
- Add new controls like a date time picker etc.
- Fetch data from external services like real-time prices calculated on your servers or real-time inventory from your CMS etc.
- Send live analytics to external services like Google Tag Manager etc.
How to get started
Setup a TypeScript project
We provide a starter project which comes with our recommended configuration (build tools, config, pre-installed packages etc.) and gives you everything you need to get started quickly.
Prerequisite
All of the following assumes that you have a current version of Node.js & npm (or some equivalent) installed on your computer.
- Open a terminal (e.g. command line in windows) in the folder where you want to create your project
- Run
npm create @combeenation/custom-code@latest - Follow the instructions of the script to create a starter project using TypeScript
How to use it
Where to start writing code
The main starting point is usually the callback to CfgrUtils.onCfgrReady within src/index.ts in which you have the guarantee that you can safely access all components & controls.
You can either write all your TypeScript logic within this function or spread it over as many functions/modules/files as you like.
Important
Always ensure that you only access components & controls after the callback to CfgrUtils.onCfgrReady was called. Otherwise there is no guarantee that all components and controls are fully bootstrapped and you could run into undefined behavior or errors.
How to run & debug during development
There are 2 ways to run & debug your application during development:
- Debugging in Chrome dev tools:
- Run
npm run devwhich will start a local dev server - Open the preview of your configurator draft
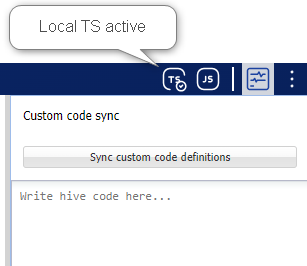
- Click the "TS icon" in the upper right to connect to the local instance
- As alternative you can also add the URI parameter
&localcts=truemanually
- As alternative you can also add the URI parameter
- Debug in browser dev tools (
F12)
- Run
- Debugging in VS Code:
- Open the view "Run and debug" in VSCode & select "Start dev" in dropdown at the top (this is only needed once).
- Press F5 to start debugging. This will automatically open a new Chrome window and run
npm run devin the background. - Open the preview of your configurator draft
- Click the "TS icon" in the upper right to connect to the local instance
- As alternative you can also add the URI parameter
&localcts=truemanually
- As alternative you can also add the URI parameter
- Debug directly in VSCode
Important
The steps above won't persist your custom code in the configurator but will load it from the hard drive of your computer.
If you'd like to share the configurator with someone else or want to publish it, you always have to upload your custom code to the CustomJS component as explained in how to upload custom code to the configurator.
How to upload custom code to the configurator
Uploading your custom code to the configurator is always required when you want to share your configurator with someone else or want to publish it.
- Run
npm run buildin your custom code project on your computer - Open the configurator editor of your draft and expand "Custom Code" in the header bar
- Upload or replace the script with the newly built file in your project folder under dist/cfgr.js
Update component typings
The required typings to work with Components can be retrieved in your Configurator editor or the preview.
The recommended way is to run the development server (as explained above) as it allows you to directly connect this local environment with your Configurator.
The UI controls should automatically be available as soon as you open a preview which is connected to the local TS.
Configurator Preview
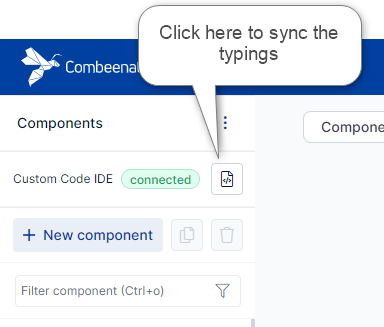
Configurator Editor
- If you aren't connected to your local IDE yet, ensure that your dev server is up and running with
npm run dev - Expand "Custom Code" in the header bar and click "Connect"
- On a successful connection you get a new toolbar in the Components list on the left:
Update them manually
- Open your configurator draft
- Expand the menu of the
Componentslist on the left - Select
Download custom code definitions - Save/Replace the file in your code project
How to access components & controls
The custom code utils package is mandatory to interact between your custom code and the configurator.
It allows you to read values from components, write new input values to them and interact with the controls in your configurator and many other features.
To work with a component ensure that your "configurator definitions file" is up to date (see previous step).
This file basically represents your components list.
If you want to access a component simply import the variable which has the identical name as your component.
This variable then provides all the available functions and properties you need.
const myValue = await MyCmp.getValue();
MyCmp.setInput('myNewString');
See the utils API documentation for more details on how to use them.
The custom code utils come pre-installed with our TypeScript start project.
You can also install them manually using npm install @combeenation/custom-code-utils.
How to interact with the 3d viewer
Combeenation has built its own 3d viewer, which is used in the 3d viewer control.
If the functionality of this 3d viewer control and its SigSlos is not sufficient, it can be extended in custom code using the API of the 3d viewer package itself.
See 3d viewer control with custom JS for more details.
FAQ
What is the config file cbn.config.json?
This file can hold information specific to the Combeenation platform.
One of its usages is, that it can create a link between your code project and the configurator. This way, the typings (cfgr-defs.generated.ts) can be automatically transferred during development.
How can I upload files into the configuration?
With version 1.1.0 the so called Configuration Files were introduced.
In Custom code you can find the respective functions under the namespace CfgnFiles.
PS: It's recommended not to use Resource components anymore, as they will be phased out in the future.
Was this article helpful?