Shopify
We highly recommend utilizing our free Shopify app if you wish to sell customizable products online through your Shopify shop. The app offers a smooth integration between the configurator and the checkout process of your Shopify shop.
Setup
To get started, some simple steps must be performed on the Combeenation platform and Shopify shop.
Combeenation platform
- Create a configurator on the Combeenation platform
- Set up a new Shopify shop in the configurator editor. (see Checkout section for more information)
- Adapt the prefilled JSON (for more information regarding the JSON, see this section)
ShopifyShop.Validate("""{{
    "products": [
        {{
            "main": {{
                "productId": "123456",
                "quantity": 1,
                "price": 99.99,
                "imageUrl": "Assetbundle1.MyImage.url",
                "title": "My coffee mug",
                "productText": "My product text",
                "weight": 10,
                "weightUnit": "KG",
                "customFields": [
                    {{
                        "id": "model",
                        "label": "Model type",
                        "value": "espresso",
                        "position": 1
                    },
                    {{
                        "id": "productionId",
                        "label": "Prod id",
                        "value": "DLU-128120-HR",
                        "position": 2,
                        "isVisible": false
                    }
                ]
            },
            "accessories": [
                {{
                    "productId": "987654",
                    "quantity": 1
                },
                {{
                    "productId": "456789",
                    "quantity": 2
                }
            ]
        }
    ]
}""")
Do not use the Hive ShopifyParameter type. Instead, build the checkout JSON as a Hive formatted string and validate it with ShopifyShop.Validate, as shown above.
The categoryId property is currently not supported. ShopifyParameter defines it as a number, while Shopify now expects a string and returns an error when it receives a number. With the text-based JSON approach, categoryId is ignored. Contact us if you need to use product categories.
JSON creation with Custom JS
There are certain scenarios where the creation of the JSON in Hive is limited. For example, a dynamic list of accessories may be cumbersome to implement with the current Hive feature set. For these cases and any other custom scenarios, you can create the JSON with Custom JS.
Combeenation offers JS typings to assist during the development process and minimize typos and errors (e.g. incorrect property names). A sample of custom JS code can be seen as follows:
const selectedAccessories = /** @type {Accessory[]} */ (CmpUtils.getCmpValue(CmpNames.SelectedAccessories));
const checkoutJson = /** @type {Cbn.CJS.ShopifyCheckoutJson}*/ ({
  products: [
    {
      main: {
        productId: CmpUtils.getTextCmpValue(CmpNames.SelectedProductId),
        quantity: CmpUtils.getNumberCmpValue(CmpNames.SelectedQuantity),
        price: CmpUtils.getNumberCmpValue(CmpNames.SelectedProductPrice),
        customFields: []
      },
      accessories: selectedAccessories.map(x => ({
        productId: x.id,
        quantity: 1
      }))
    }
  ]
});

CmpUtils.setCmpInput(CmpNames.ShopifyCheckoutJson, checkoutJson);
Validate JSON
In Hive the Shop type provides a function for validating the JSON (for both Text and Object-based parameters). We highly recommend using this function, because it allows you to quickly find problems in the JSON structure:
ShopifyShop.Validate(ShopifyCheckoutJson);
Shopify shop
- Install the Combeenation app from the Shopify app store
- Go to "Apps -> Combeenation Configurator App -> Configurators"
- Add your configurator
For more information, see this section below.
Usage details
Products
- You can add one or multiple configurable products to the cart.
- The plugin will check the SKU before adding it to the cart
- Existing SKU: the existing product (with all its predefined parameters like price, title, ...) will be added to the cart
- New SKU: The app will create a new product with the custom properties defined in the JSON. Those products will be cleared up after some time or if the order was successful.
- With
customFieldsown properties can be defined and pushed to Shopifyid... should be unique and can be used for further processing via Shopify/API/ERP/CRM systemslabel... display name of the custom field the user sees in the cart (if visible is true)value... is the value of the custom fieldposition... defines the position of the custom field in the user cart- Visibility: Custom fields can be hidden by prefixing the
idandlabelwith_(e.g._myHiddenField)- Visible fields can provide additional info to the user (e.g. selected model/color/...)
- Invisible fields can be used for further processing data in Shopify or via API (e.g. internal technical information, IDs, ...)
- Both kinds of custom fields are later accessible in the backend in the order overview:
-5e8d18bc36336b634aad193f3a96651b.png)
Prices & tax
- There is currently still an extra price property in the Shopify shop (similar to the other shop types). It will be used for the dashboard metrics, it won't be transferred to the Shopify shop.
The one who builds the configurator has to display the price correctly. This means it has to adhere to Shopify settings.
Usually Shopify adds the tax only during checkout, this means there are two options for those who build the configurator:
- Displaying the user the gross price in the configurator, but passing the net price to the Shopify app, in order to let Shopify add the tax during checkout
- Displaying the user the net price in the configurator and also passing this info to the Shopify app. In this case the user should be informed that the price is without taxes.
Accessories
- Accessories are usually products in the Shopify shop the user wants to add to the cart alongside with the configuration
- Accessories product price will be retrieved from Shopify
- Accessories are always standalone items in the cart. Bundles are not supported in Shopify (in contrast to the Shopware shop)
App configuration
General
The app configuration is used to define the dimensions of the iframe and properly configure the app and configurator base URLs.
-a3fe5b17e92db928a0a8f92a9e0692c5.png)
App settings include the following configurations:
- Sales channel selection
- iFrame width + unit for product detail page
- iFrame height + unit for product detail page
- Plugin base url:
https://portalcombeenation.com/plugin - Configurator base url:
https://portalcombeenation.com/Cfgr
Configurators
Within Combeenation Configurator App -> Configurators you can create and manage configurators for your Shopify shop.
Create new configurator
-a309214513ccede5bfbadde0a9d6a4f2.png)
Each shop can be configured with unlimited configurators. These can all be individually customized.
- Id: Will be generated upon creation. The app block requires this id.
- Name: Please enter the name of the configurator you’ve created in the Combeenation Platform
- Company: Please enter the company name according to Combeenation Platform. The company name is part of the iFrame Url
- Hash Secret: Please enter the hash secret according to Combeenation's specifications. The hash secret is part of the iFrame url (leave blank for 3D/AR viewer)
- Status: The configurator can be enabled or disabled for this product
- Priority: Product configurator display is done according to the highest priority (so you don’t need to remove your product from another configurator, instead you just set the priority higher, and then only the settings on the one with a higher priority count)
- Hide "Add to cart" button: Hide the button on the product detail page
- Edit products: Here you can select the products which should be assigned to this
configurator. You can select as many as you’d like.
Advanced configuration
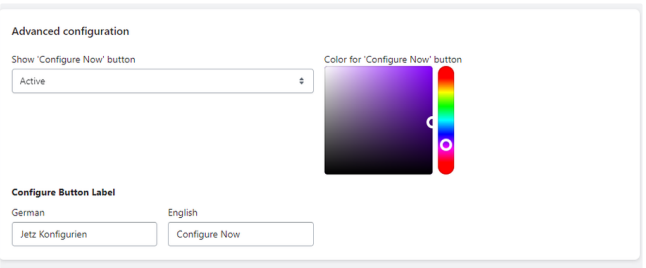
You are able to replace the Add-to-cart button with a customizable Configure Now button.
It offers the flexibility to customize the button's label text and color to match the shop's design language seamlessly.
Configurator Embed Block
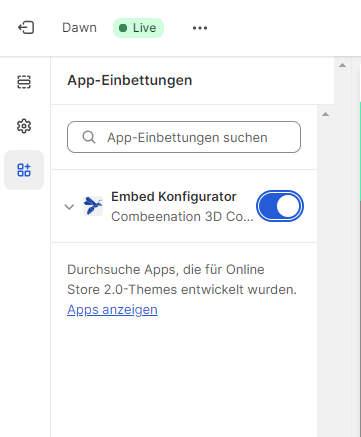
If you are using an Online Store 2.0 theme, you must enable the Configurator Embed Block for the plugin to work in your shop.
To enable the Embed Block, go to the theme editor, click the third icon on the left, and then enable the “Embed Configurator” block.
Configurator Block
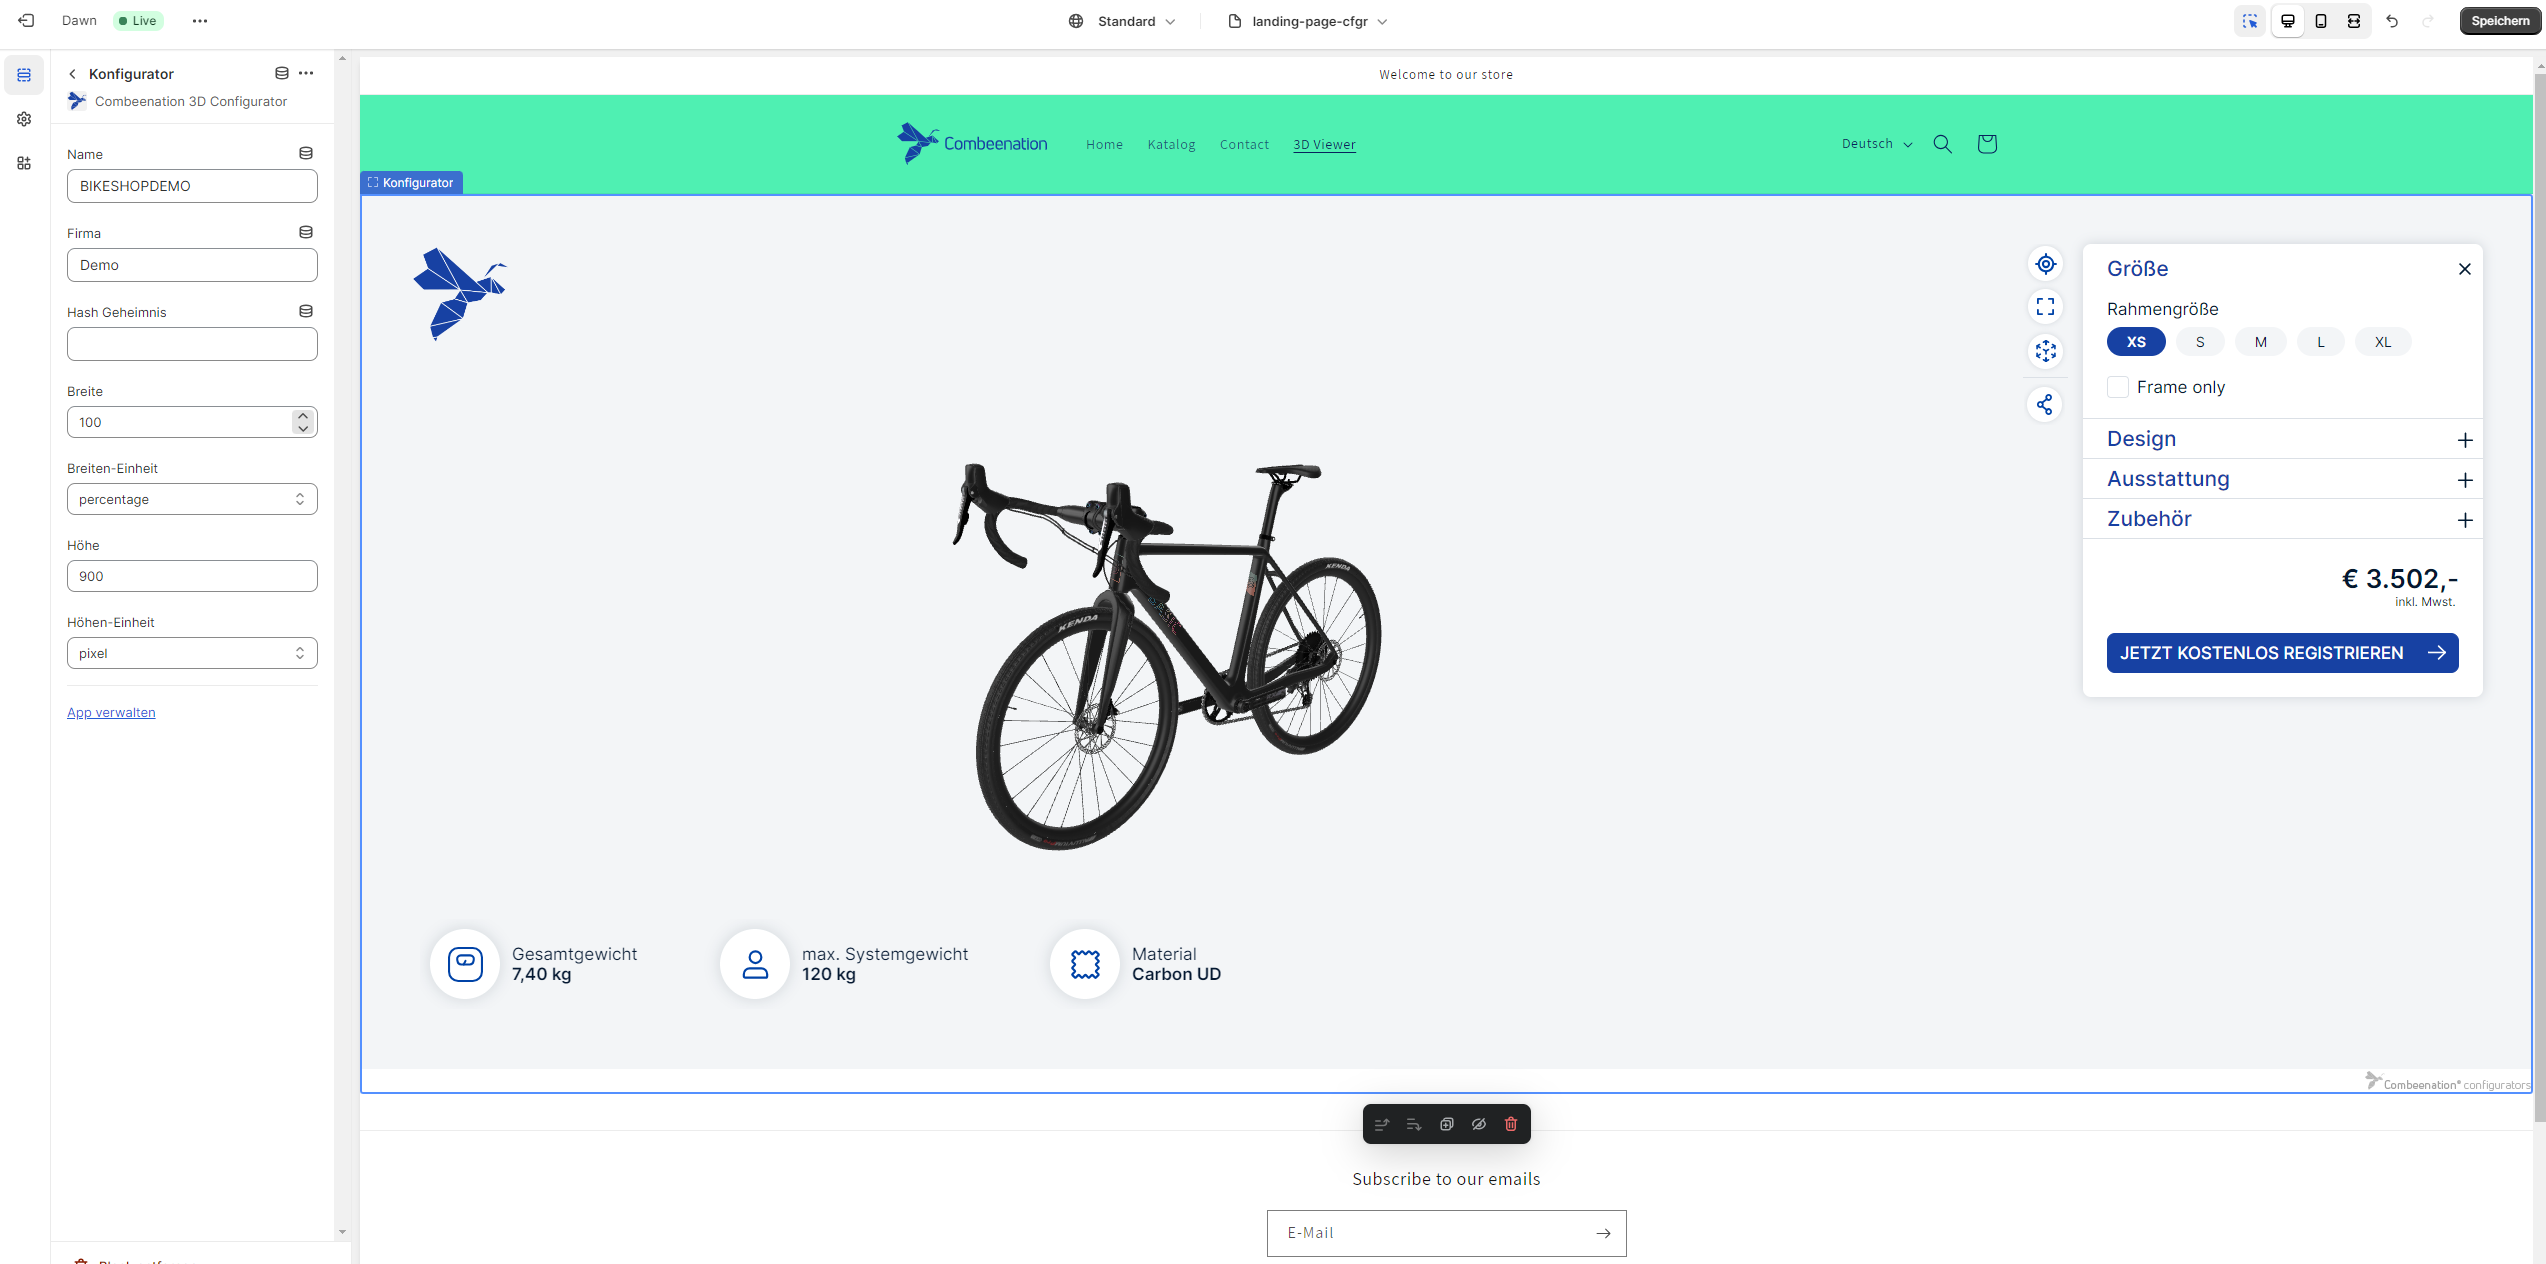
A new configurator-block can be added by going into the Theme-Editor and adding a new section where under “Apps” a block with the name Configurator appears
-2b73c287a090adfe8f666846fef2b0d4.png)
The rest of the process is similar to the general settings, except that height and width can be set for each block. Only one block can be added per page, as multiple blocks can cause problems.
Product Page
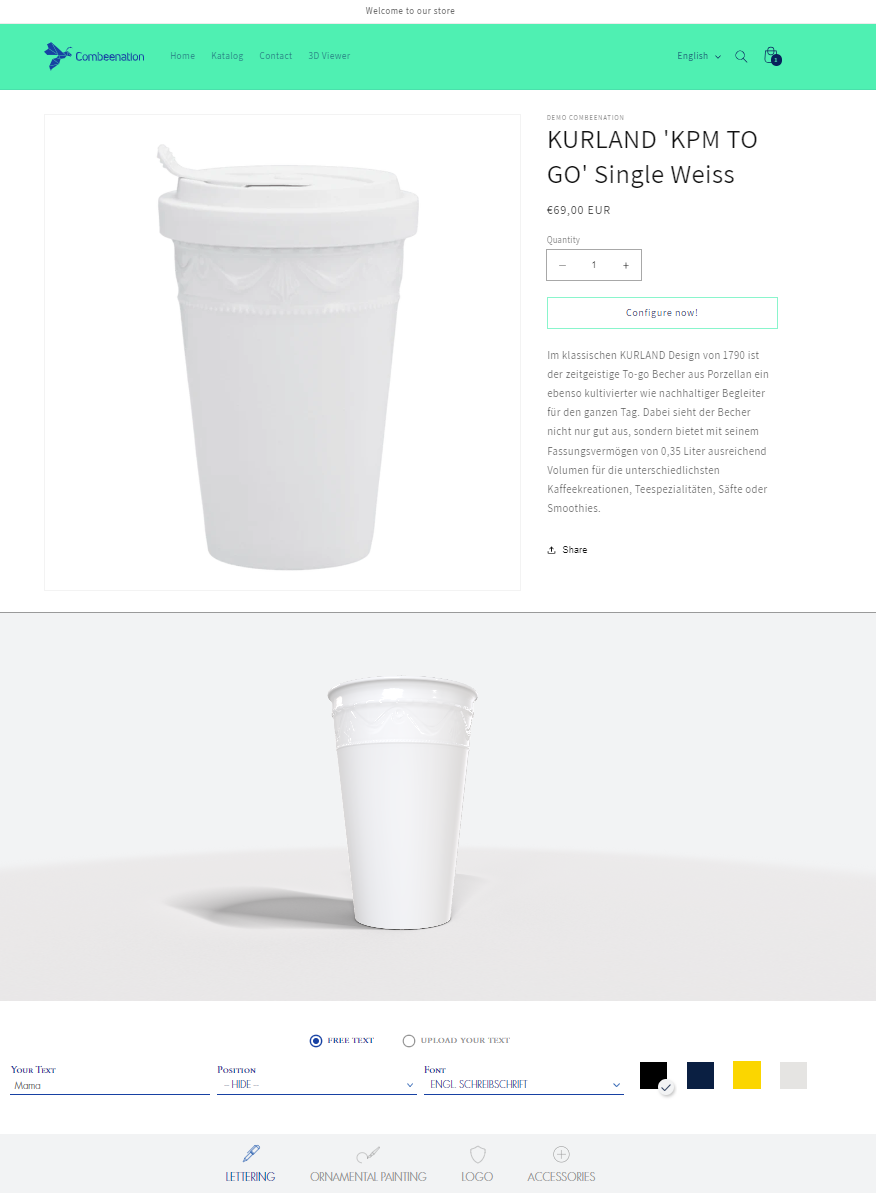
On the product page, the Configurator will appear below the Product. Once the product has been added to the cart using the configurator, it automatically redirects the customer to the cart, adding the custom products and any additional products in the process.
Import data into Combeenation
To import data from Shopify into the Combeenation platform, follow these steps:
- Obtain API Access Token: Generate an admin or storefront API access token in Shopify by creating a custom app.
- Create JSON data source asset: Create an asset bundle with a JSON data source that the workflow updates manually or on a schedule.
- Set Up Workflow: Configure a workflow in the Combeenation backend to retrieve data from the Shopify GraphQL endpoint.
Obtain API Access Token
In order to get the an API access token follow the Shopify guide to create a custom app. After you have created the app, the admin API access token will be displayed once, store it securely, this token is later required for the workflow.
You can also use the storefront API access token to interact with the storefront API. However, be cautious, as this API primarily provides publicly available data and may not include all the information you need. It might not be sufficient for all use cases.
Create JSON data source asset
In order to use the data from Shopify in your configurator, you have to create a JSON data source asset. If you have no experience with assets, see Getting started with assets first.
If you have an asset bundle, we recommend the following steps:
- Install GraphiQL explorer in your Shopify shop
- Open the GraphiQL and construct a GraphQL query with the necessary information about your products. Example GraphQL query:
{
  products(first: 250) {
    edges {
      node {
        id
        title
        productType
        infoArea: metafield(namespace: "custom", key: "info_area") {
          id
          key
          value
          namespace
        }
        variants(first: 1) {
          edges {
            node {
              sku
              inventoryQuantity
              price
            }
          }
        }
        images(first: 1) {
          nodes {
            url
          }
        }
      }
    }
  }
}
- The explorer should now show you the resulting JSON, store this as a file
- Upload the file to your asset bundle as a file asset and assign a clear, descriptive name (e.g.
ShopifyProductsExport) - Based on this file asset you can now create one or multiple JSON based data sources (see docs for more info)
- If you have created at least one data source you can continue with the workflow.
Set Up Workflow
The final step is to create a workflow (see docs for more info) that retrieves the product data from Shopify and updates your created asset bundle + configurators.
The workflow sends a POST request to Shopify's GraphQL API. Upon successful data retrieval, it will:
- Create a new draft version of the asset bundle.
- Update the file asset, automatically refreshing all associated data sources.
- If all steps are completed successfully, the asset bundle and linked configurators will be published, providing customers with the most up-to-date data from Shopify.
Here’s an example workflow. Ensure you replace the placeholder data accordingly:
bundleparameter ... needs to be configured in the workflow parameter settings<ACCESS_TOKEN>... retrieved in the step above<GRAPHQL_QUERY>... retrieved in the step above<SHOP_NAME>... name of your Shopify shop, can be found in the URL (e.g.https://<SHOP_NAME>.myshopify.com)<FILE_ASSET_NAME>... retrieved in the step above (e.g.ShopifyProductsExport)
import { bundle } from '@workflow/parameters';

export function run() {
  const requestConfig = {
    headers: {
      'Content-Type': 'application/json',
      'X-Shopify-Access-Token': '<ACCESS_TOKEN>' // header name varies for storefront API
    }
  };
  const content = {
    query: '<GRAPHQL_QUERY>'
  };

  // 1. try to retrieve the data from Shopify admin API endpoint (url + header name may vary for storefront API)
  return http
    .post('https://<SHOP_NAME>.myshopify.com/admin/api/2025-01/graphql.json', JSON.stringify(content), requestConfig)
    .then(response => {
      // 2. create a new asset bundle draft based on the asset bundle parameter
      return bundle.createDraft().then(draft => {
        // 3. get the file asset which should be updated
        const fileAsset = draft.getAsset('<FILE_ASSET_NAME>');
        // 4. update the shopify file asset
        return fileAsset.update(response.data).then(_ => {
          // 5. publish the asset bundle draft & all configurators
          return draft.publish(_ => {
            return true;
          });
        });
      });
    })
    .catch(error => {
      printError(error);
    });
}

function printError(error) {
  console.error('Error occurred: ' + error);
  console.debug('Url: ' + error.url);
  console.debug('Message: ' + error.message);
  console.group('Start printing error response');
  printResponse(error.response);
  console.groupEnd();
}

function printResponse(response) {
  console.log('Status-Code: ' + response.status);

  console.group('Start printing headers...');
  for (const key in response.headers) {
    console.log(`${key}: ${response.headers[key][0]}`);
  }
  console.groupEnd('Printing headers finished.');

  if (response.data !== undefined) {
    // `url` returns the URL of the retrieved data
    console.log('Data URL: ' + response.data.url);
    // `raw` string is only defined, if data is smaller than 1MB
    console.log('Data Raw: ' + response.data.raw);
  }
}
Whitelisting & Shopify Domains
If you use the whitelist feature to restrict which domains may embed your configurator, you need to add all domains that will load it — including those used by Shopify's own infrastructure.
In addition to your public shop URL (e.g. https://myshop.com), the following domains must be whitelisted so the configurator also works inside the Shopify theme editor backend:
- Your internal Shopify shop domain — this is your real
.myshopify.comaddress, e.g.https://demo-combeenation.myshopify.com.
To find it, log in to your Shopify admin and look at the URL in your browser — it will be in the formathttps://<your-shop-name>.myshopify.com. Alternatively, go toSettings > Domainsin your Shopify admin; your.myshopify.comdomain is always listed there. https://admin.shopify.comhttps://online-store-web.shopifyapps.com
Without these entries the configurator will fail to load when you preview or edit your theme in the Shopify theme editor.
FAQ
Why is the configurator not visible on the Shopify product page?
- Check that the configurator is published in the Combeenation backend.
- In the Shopify app, verify the company name, configurator name, and status in the configurator settings. The hash secret is not relevant for visibility.
- To display it on the product detail page, check that the product is assigned to the configurator in the Shopify app.
- If you use whitelisting, check that the product page's domain and Shopify's theme editor domains are included in the whitelist.
Why is the configurator not visible after adding an app block?
-
Is the app block added to a product detail page, or are there multiple app blocks on the same page? This scenario is not supported.
When customers edit a configured product from the cart, they are redirected to the product page and the corresponding configuration session is restored in the iframe. If multiple iframes were allowed on a page, the app could not determine which iframe should display the restored session.
Why can't the product be added to the cart?
- Use
ShopifyShop.Validateto check that the checkout JSON has the correct structure. See JSON creation with Custom JS and the Hive example. - Verify the Shopify app configuration, especially the hash secret and selected sales channel.
- For an existing product, verify that its SKU is active, in stock, and available for the store location selected in the Shopify app.
- For a newly created product, wait for Shopify to create and publish it before adding it to the cart. See Why does adding a newly configured product take time?.
Why does adding a newly configured product take time?
Adding a newly configured product to the cart is not instantaneous. Because every configuration is unique, the plugin must:
- Create a new product in Shopify.
- Wait for Shopify to process and publish the product so it becomes available in the storefront.
- Add the product to the cart.
Product creation itself is usually fast. Most of the delay occurs while Shopify makes the product available in the storefront. Attempting to add the product before this process is complete results in an error.
Can this be optimized?
Shopify does not currently provide a way to bypass or accelerate this synchronization. The plugin must wait until Shopify confirms that the product is available before adding it to the cart.
Existing vs. New Products
- Existing products: Adding to the cart is much faster because no product creation is required.
- New configured products: A new Shopify product must be created and synchronized first, which introduces the additional delay.
Custom Integrations
If your storefront requires a different workflow, a custom integration is possible. Instead of letting the plugin add the product to the cart, it can send the generated JSON to the parent Shopify page, allowing you to implement your own cart or checkout logic.
Why are custom fields not visible in the cart?
Custom fields are hidden when both their id and label begin with an underscore, for example _myHiddenField. Hidden fields are still included in the Shopify order and can be used for backend processing. See Products.
Why are accessories shown as separate cart items?
Accessories are standalone Shopify products, and Shopify does not support product bundles in this integration. Their prices are retrieved from Shopify. See Accessories.
Why are configured products visible in my Shopify catalog?
The app creates a Shopify product for each configured item, then deletes it after a successful order or after a fixed period when no order is placed. To hide these temporary products from collections, exclude products with the type COMBEENATION CONFIGURATOR SURCHARGE PRODUCT.
Is the app compatible with every Shopify theme?
Shopify's theme guidelines do not allow compatibility with every theme to be validated. We mainly test the compatitlby against the "Dawn" theme. Test the app thoroughly with your selected theme before publishing it.
Why can't I query more than 250 items?
The GraphQL API has an upper limit of 250 entries. To retrieve more items, use pagination in your workflow.