- Print
- DarkLight
We highly recommend utilizing our free Shopware 6 plugin if you wish to sell customizable products online through your Shopware 6 shop. The plugin offers a smooth integration between the configurator and the checkout process of your Shopware shop.
Setup
To get started some simple steps must be performed on the Shopware shop and the Combeenation platform.
Prerequisites
In order to use the Combeenation platform with Shopware 6, you must be using the self-hosted version of the software.
The configurator must be created/hosted on the Combeenation platform, and you must ensure that the Shopware 6 shop has been added to it. Further details can be found in the Combeenation platform documentation (see below)
Combeenation platform
Set up a new Shopware 6 shop in the configurator editor. (see Checkout section for more information)
Adapt the prefilled JSON, see below
To pass data from the Combeenation platform to Shopware, a JSON object with a specific structure must be created. When creating a new shop, an example object will be provided.
new Shopware6Parameter {
  //addToWishlist: true, // determines if this product and all its accessoires will be added to the wishlist instead of the cart (default: false)
  products : [
    // (mandatory) at least one product must be defined
    new {
      main : new {
        productId : "123456",  // SKU id from your Shopware system
        quantity : 1,
        price : 99.99, // gross price of the configured product WITHOUT accessories
        imageUrl : "Assetbundle1.MyImage.url", // url to the image which will be used in the cart
        title : "My coffee mug", // new title of the product
        productText : "My product text",  // new description of your product
        customFields : [ // (optional)
          new {
            id : "model", // unique identifier
            label : "Model type", // label which the user will also see in the cart (if it is visible)
            value : "espresso", // value of the custom field
            position : 1, // position in the cart
            //isVisible: true // if it should be visible in the cart (default: true)
          },
          new {
            id : "productionId",
            label : "Prod id",
            value : "DLU-128120-HR",
            position : 2,
            isVisible : false
          }
        ]
      },
      // (optional) additional predefined Shopware products which will be added to the cart (no custom price/image/title)
      accessories : [
        new { productId : "987654", quantity : 1 },
        new {
          productId : "456789", // Shopware sku
          quantity : 2,
          // if false (default) the product will be linked to the main product and can't be deleted from cart
          // if true the product will be added as a standalone product to the cart
          isSingleCartItem : true
        }
      ]
    }
  ]
}
Let's go
At this point, your configurator is embedded on Shopware and a checkout should be possible. Give it a try!
JSON creation via custom JS
There are certain scenarios where the creation of the JSON in Hive is limited. For example, a dynamic list of accessories may be cumbersome to implement with the current Hive feature set. For these cases and any other custom scenarios, you can create the JSON with Custom JS.
Combeenation offers JS typings to assist during the development process and minimize typos and errors (e.g. incorrect property names). A sample of custom JS code can be seen as follows:
const selectedAccessories = /** @type {Accessory[]} */ (CmpUtils.getCmpValue(CmpNames.SelectedAccessories));
const checkoutJson = /** @type {Cbn.CJS.Shopware6CheckoutJson}*/ ({
  products: [
    {
      main: {
        productId: CmpUtils.getTextCmpValue(CmpNames.SelectedProductId),
        quantity: CmpUtils.getNumberCmpValue(CmpNames.SelectedQuantity),
        price: CmpUtils.getNumberCmpValue(CmpNames.SelectedProductPrice),
        customFields: [],
      },
      accessories: selectedAccessories.map(x => ({
        productId: x.id,
        quantity: 1,
        isSingleCartItem: true,
      })),
    },
  ],
});

CmpUtils.setCmpInput(CmpNames.ShopwareCheckoutJson, checkoutJson);
Validate JSON
In Hive the Shop type provides a function for validating the JSON (for both Text and Object-based parameters). We highly recommend using this function, because it allows you to quickly find problems in the JSON structure:
Shopware6Shop.Validate(ShopwareCheckoutJson)Shopware shop
Install the plugin in your Shopware 6 shop
Go to "Settings -> Extensions -> Combeenation Configurators -> Product Configurators"
Add your configurator
For more information scroll down.
Usage details
Products
You can add one or multiple configurable products to the cart.
You can add one or multiple configurable products to the wishlist if the flag
addToWishlististruesdf
Price, title, image, descriptionare optional, if not set the values from the Shopware product will be used. -> Exception: If accessoires are added a price for the main product must be set.With
customFieldsown properties can be defined and pushed to the Shopware systemid... should be unique and can be used for further processing via Shopware/API/ERP/CRM systemslabel... display name of the custom field the user sees in the cart (if visible is true)value... is the value of the custom fieldposition... defines the position of the custom field in the user cartisVisible... defines if this custom field should be visible in the cartVisible fields can provide additional info to the user (e.g. selected model/color/...)
Invisible fields can be used for further processing data in Shopware or via API (e.g. internal technical information, IDs, ...)
Prices & tax
There is currently still an extra price property in the Shopware 6 shop (similar to the other shop types). It will be used for the dashboard metrics, it won't be transferred to the Shopware shop.
Tax rate and tax state will be given to the configurator via query parameters
Tax rate may vary per country based on the different value-added tax (VAT)
Access the tax rate in Hive with
Configuration.getParameter(Shopware6Shop.TaxRate)(valid values:1-100)Tax state vary based on the user account (user or merchant)
Access the tax state in Hive with
Configuration.getParameter(Shopware6Shop.TaxState)(valid values:netorgross)Configurator has to display the price correctly according to given parameters.
Configurator needs to display the correct price
The one who builds the configurator has to display the price correctly. This means it has to adhere to the given tax parameters from the Shopware 6 shop. E.g. display net price if the tax state is
net.Configurator needs to pass the correct price to the cart
The price given back to the Shopware system should be the gross price of the configured product WITHOUT the accessories.
Accessories
Accessories are usually products in your Shopware shop the user wants to add to the cart alongside with the configuration
Accessories product price will be retrieved from Shopware
Accessories can be connected to the main configured product (
isSingleCartItem: false) or can be added as standalone cart item (isSingleCartItem: true).Standalone items can be deleted/updated without any effect on the customized configuration
Plugin configuration
The plugin configuration is used to define the dimensions of the iframe and properly configure the plugin and configurator base URLs.

click to expand
Plugin settings includes the following configurations:
Sales channel selection
iFrame width + unit for product detail page
iFrame height + unit for product detail page
Plugin base url: `https://portalcombeenation.com/plugin/`
Configurator base url: `https://portalcombeenation.com/Cfgr/`
Shopware 6 settings in detail
Within Settings -> Extensions, there is a menu item "Combeenation Configurators" which allows to create and manage configurators.
By clicking on the 3 dots on the right, configurators can be edited, duplicated and deleted. You can create one or more configurators.
Create configurator
When creating a new configurator, the following settings are available:
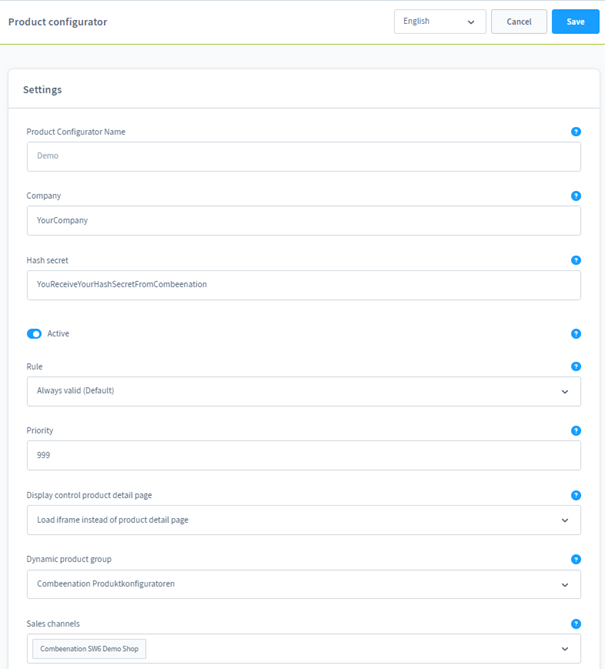
Settings
Product configurator name
Please enter the name of the configurator you’ve created in the Combeenation Platform. The configurator name is part of the iFrame Url.
Company
Please enter the company name according to Combeenation Platform. The company name is part of the iFrame Url.
Hash Secret
Please enter the hash secret according to Combeenation's specifications.
Active circuit
You must set your configurator active
Rule
A rule builder can be added for the display control of the configurator.
If the configurator should always be displayed, select the rule "Always valid (default)".
Priority
Product configurator display is done according to the highest priority
Display control product details page
There are 3 integration types for the product details page to choose from.
On the product details page, the article number is also passed to the iFrame in order to load the correct article.
Dynamic product group
For the integration on the product detail page, a dynamic product group is required. The Combeenation configurator is then loaded for these dynamic products.
Sales channels
Selection of the sales channels in which the product configurator should be displayed.
Display control product details page
Load iFrame instead of product details page
The plugin automatically loads the Combeenation configurator on the product detail page of the respective article. As mentioned above, the specific loading of the article is accomplished by adding the product id as url parameter to the configurators iFrame.Product detail page with configurator button - without add to cart button
The standard product detail pages are displayed and the shopping cart button is replaced with the "configure now" button. The article is not orderable without configuration.
Clicking the button loads the configurator in the "Configurator" tab.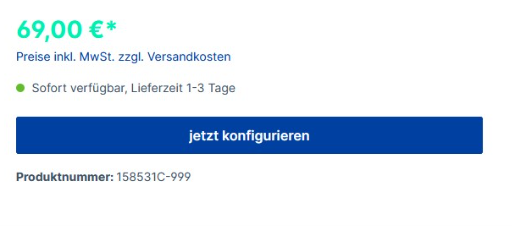
click to expand
Product details page with configurator button - with add to cart button
The standard product detail pages are displayed with the "configure now" button and the standard add to cart button from Shopware. Items can be added to the shopping cart without configuration.
Clicking on the button loads the configurator in the "Configurator" tab.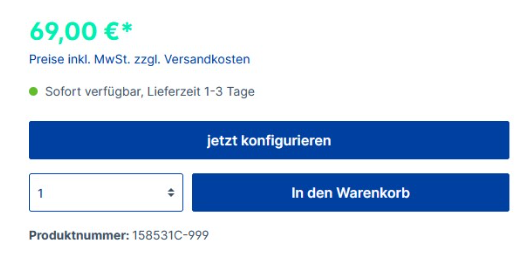
click to expand
Configurator Integration via Shopping Experience
You can easily integrate your configurator with a shopping experience block/element anywhere in your store.
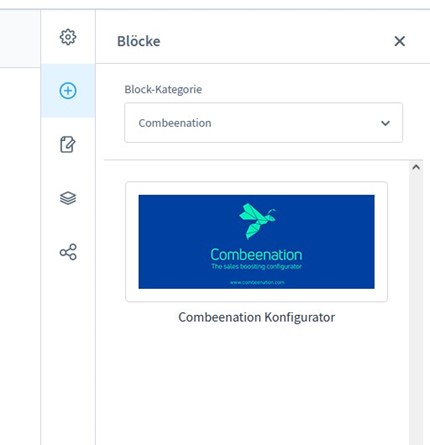
Settings
Combeenation Configurator
Please select the configurator which should be displayed in the experience world
iFrame width + unit
iFrame height + unit
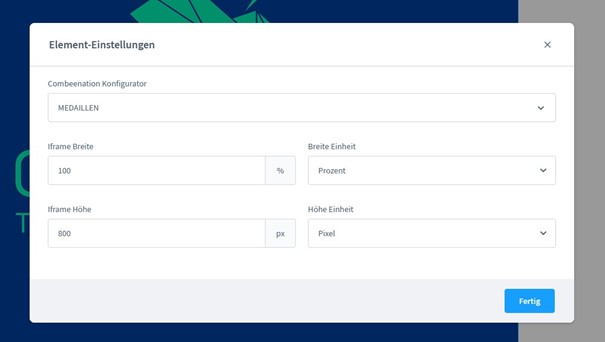
Product detail page via Shopping Experience
If you have configured the product details page via Shopping Experience, you must replace the Buybox and Gallery by setting the “display control product detail page” to "load iFrame instead of product details page". All other display controls are automatically integrated into the product details page shopping experience.
REST API
The transferred configuration data is stored per order line item. This data is fully accessible via the Shopware backend or via the Shopware REST API.
To access the Shopware OAuth API you first have to retrieve an `access token`, the full process is described in the Shopware docs.
POST https://yourshop.com/api/oauth/token
Content-Type: application/json

{
    "grant_type": "client_credentials",
    "client_id": "YOUR_ID",
    "client_secret": "YOUR_SECRET"
}
If you already know the order line item of your order, you can simply request this entry via the http://yourshop.com/api/order-line-item/{id} call, for more info see here. Example response from order item:
  {
            "id": "b42159bbfcf644809bde62d9d2c0fe5f",
            "type": "order_line_item",
            "attributes": {
                "productId": "c5d43dc9a4784b399b81a774d5ff5377",
                "quantity": 1,
                "label": "Single Weiss",
                "payload": {
                    "combeenationPrice": 359,
                    "combeenationImageId": "4e461b3abd36451aacab32be44f87a0d",
                    "combeenationCustomFields": [
                        {
                            "id": "textInput",
                            "label": "Texteingabe",
                            "value": "Combeenation",
                            "position": 1,
                            "isVisible": true
                        },
                        {
                            "id": "textPosition",
                            "label": "Textposition",
                            "value": "Vorne oben",
                            "position": 2,
                            "isVisible": true
                        },
                        {
                            "id": "font",
                            "label": "Schriftart",
                            "value": "Lobster",
                            "position": 3,
                            "isVisible": true
                        },
                        {
                            "id": "fontColor",
                            "label": "Schriftfarbe",
                            "value": "Royalblau",
                            "position": 4,
                            "isVisible": true
                        },
                        {
                            "id": "logoUrl",
                            "label": "Logoupload URL",
                            "value": "https://combeespecs.blob.core.windows.net/resources/ACRIS/PORZELLAN/resources/0C9aCfcJYWG.png",
                            "position": 5,
                            "isVisible": true
                        },
                        {
                            "id": "logoSize",
                            "label": "Logo-Größe",
                            "value": "M",
                            "position": 6,
                            "isVisible": true
                        },
                        {
                            "id": "fondColor",
                            "label": "Fond-Bemalung",
                            "value": "Eisenrot",
                            "position": 9,
                            "isVisible": true
                        }
                    ],
                    "combeenationConfiguratorEditUrl": "164537474310767104/edit/0BsbN0hebq4",
                    "combeenationConfiguratorId": "164537474310767104",
                    "isCloseout": false,
                    "customFields": {
                        "acris_cms_layout_slot_config": []
                    },
                    "createdAt": "2022-10-07 09:19:35.559",
                    "releaseDate": null,
                    "isNew": false,
                    "markAsTopseller": null,
                    "purchasePrices": "{\"extensions\":[],\"currencyId\":\"b7d2554b0ce847cd82f3ac9bd1c0dfca\",\"net\":0,\"gross\":0,\"linked\":true,\"listPrice\":null,\"percentage\":null,\"regulationPrice\":null}",
                    "productNumber": "158531C-999",
                    "manufacturerId": "0fd9e3fa3a6e4980870116111dc37a15",
                    "taxId": "9a518fcac39347a78155c7a711217dd5",
                    "tagIds": null,
                    "categoryIds": [
                        "12e24ea60d684d5e8116fbc588c6e76c",
                        "617f724d27894167a39e56605f3ed9be"
                    ],
                    "propertyIds": null,
                    "optionIds": null,
                    "options": [],
                    "streamIds": [
                        "9e618e47ab5a415d89d71b487c7cb1b1"
                    ],
                    "parentId": null,
                    "stock": 999,
                    "features": []
                },
                "good": false,
                "position": 2,
                "unitPrice": 379.0,
                "totalPrice": 379.0,
                "customFields": null,
                "apiAlias": null
            },
            "links": {
                "self": "https://YOURSHOP.com/api/order-line-item/b42159bbfcf644809bde62d9d2c0fe5f"
            },
            "relationships": [],
            "meta": null
        }
If you first have to find the order line item, you could use the search api to find all items from an order for a given order id, this looks something like:
POST https://yourshop.com/api/search/order
Content-Type: application/json
Accept: application/json
Authorization: Bearer YOUR_ACCESS_TOKEN

{
  "associations": {
    "lineItems": []
  },
  "filter": [
    {
      "type": "equals",
      "field": "orderNumber",
      "value": "10014"
    }
  ]
}
Email Template (Order Confirmation Including Configurator Data)
While installing the plugin, a new email template for the order confirmation is created. You must replace this template so that the additional configuration data is displayed in the email.
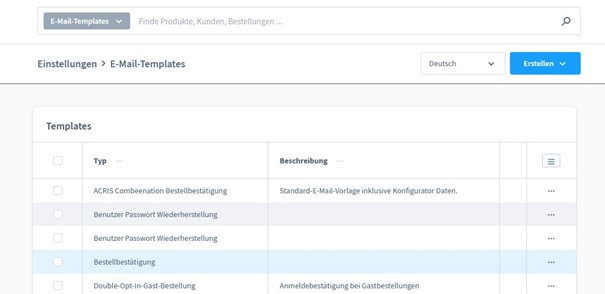
Order Overview
Orders placed via the configurator are displayed in the orders overview like all other orders. Since the exact same configuration might not be available later on, the repeat order function is disabled for such orders.
Wishlist
To add a product to the wishlist the JSON must be adjusted accordingly see here.
Activate wishlist
Please note that shop visitors who are not logged in must accept the cookie for the wish list in order to use the functions. The cookie is listed in the comfort functions section of the storefront cookie manager.
Import Shopware products into Combeenation
This can be done via Workflows and Shopware sales channel. The Shopware sales channel provides a product feed in any possible format (e.g. CSV, XML, ...). This feed can then be used by the workflow to update a data source.
Shopware Sales Channel
For the creation of a channel, follow the steps in the Shopware documentation. Recommended values for product export sections are:
File name: something which relates to the products you are exporting (e.g. bikes.csv) or something generic (cbnExport.csv)
Encoding: UTF-8
File format: CSV
Interval: is based on the frequency of your product changes (if there are no daily updates, you can set the interval without problem to 24h or higher)
Dynamic product group: Create a dynamic product group in order to export only the products which are relevant to the configurator
After that we will adapt the template of the channel to serve a CSV which is supported as data source input. Sample template provided below:
"sku","price","title","weight","deliverable","manufacturer","imageUrls","Property A","Property B""{{ product.productNumber }}",{% set price = product.calculatedPrice %}{%- if product.calculatedPrices.count > 0 -%}
{% set price = product.calculatedPrices.last %}
{%- endif -%}
{{ price.unitPrice|number_format(2, '.', '') }},"{{ product.translated.name }}",{{ product.weight }},"{%- if product.availableStock > 0 -%}true{%- else -%}false{%- endif -%}","{{ product.manufacturer.name }}","{% if product.cover is not null %}{{ product.cover.media.url }}{% endif %}","{%- for property in product.properties -%}{# Property A #}
{%- if property.groupid == 'f057d0f4d7014a8eb85666d7f96cc844' -%}{{property.name}}{%- endif -%}
{%- endfor -%}","{%- for property in product.properties -%}{# Property B #}
{%- if property.groupid == 'ef5bedbd0ea946c28e4cf5e90efc4d62' -%}{{property.name}}{%- endif -%}
{%- endfor -%}"For testing the Shopware feed click "Generate preview", if the result is a valid CSV, you are ready for the next step.
Retrieve the URL to the Shopware by navigating back to "General" -> "API access" and copy the export url, which we need for the workflow.
Good to know
The template language used by Shopware is twig.
The id of the property can be found by navigating to the according property and copying it from the URL
The body doesn't contain any new line, because the resulting CSV should only contain a new line at the end of a product.
Workflow
In order to import the products from Shopware we will create a new workflow in your company. In the parameter sections of your workflow add an asset bundle parameter to the bundle which contains your data source. Furthermore create a file parameter, which is basically just the URL we copied earlier in Shopware. This will download the feed from the shopware and make it available for the workflow.
Below is an example workflow with two Shopware feeds and two data sources which will be updated.
import { bundle, shopwareFeed, shopwareFeed2 } from "@workflow/parameters";

export function run() {
  // 1. create a new asset bundle draft based on the asset bundle parameter
  return bundle.createDraft().then(draft => {
    // 2. get the data source assets which should be updated
    const myDs = draft.getAsset("myDs");
    const myDs2 = draft.getAsset("myDs2");

    // 3. update all data source assets
    return myDs.update(shopwareFeed).then(_ => {
      return myDs2.update(shopwareFeed2);
    }).then(_ => {
      // 4. after updating all asset bundles, we publish asset bundle draft
      draft.publish(cfgr => {
        // for the dev configurator we won't perform a publish
        if (cfgr.name == "MYCFGRDEV") {
          return { update: true, publish: false };
        }
        return { update: true, publish: true };
      });
    });
  });
}
Good to know
This example contains two feeds to demonstrate, that one workflow and can also updates several data sources in one draft without publishing it in between


