Checkout
- 02 May 2024
- 3 Minutes to read
- Contributors


- Print
- DarkLight
Checkout
- Updated on 02 May 2024
- 3 Minutes to read
- Contributors
- Print
- DarkLight
Article summary
Did you find this summary helpful?
Thank you for your feedback!
The main purpose of the Checkout is to complete a configuration and export certain information/data from this configuration to the customer, shopping cart, ERP system or third party application.
Combeenation provides a broad variety of checkout options including Shopware, WooCommerce, mails, REST or FTP calls or a do it yourself approach.
Quickstart
You can create a shop for the checkout type of your liking by clicking on the ➕ icon in the upper right corner of the CheckoutComponent editor.
Whilst you can create multiple checkout shops, there's always exactly 1 active shop at a time. The active shop is determined by the resulting value of the Hive script in the CheckoutComponent's Shop property.
Change the shop by selecting it via the input value
Since this Hive script can also take its input into consideration, there are many different ways to define which shop should be activated. E.g. by selected preset, by given URI paramter, by the wizard page on which the checkout was initiated, ...
Checkout and stages
A configurator stage can be used to test all features of a configurator, including checkout.
However, depending on the type of shop you use in your checkout, you may want to use different checkout settings in a configurator stage. For instance, when sending a mail in a staged configurator, you may want to send that mail to a test address rather than your primary contact address. Or if you have an entirely separate QA environment for your website and/or shop solution you may have to use different product IDs, connection strings, authentication tokens or similar.
In order to achieve slightly different behavior in configurator stages, you can explicitly test if the configurator is published, staged or in preview:
if configurator.IsPublished then
  "sale@demo.com"
else
  "test@demo.com"
end
Depending on how much your staging checkout differs from a published version, a simple if/else expression in e.g. the recipient field of a mail shop may suffice.
Another option is to create an entirely separate Shop for your staging checkout and then use that in the Shop property of the Checkout component.
Advanced configuration
How to trigger the checkout
The checkout can be triggered using Signals and Slots in the design editor, by binding the CheckoutComponent's Do checkout slot to the clicked signal of a button.
During the SigSlo setup you can optionally also set the Selected shop, which will set the input value for CheckoutComponent shop property.
Don't forget to use the input value!
The Hive rule of the
CheckoutComponent shop property must actively use its input for the Selected shop paramter to actually take effect.Customizing the checkout load mask
By default, the configurator shows a load mask with the text "Adding configuration to cart..." when the checkout is started. This load mask is never hidden by default and will stay there until the user leaves the site or closes the tab or browser.
Since most checkouts redirect to the shopping cart after the checkout is succeeded, the load mask will only be visible briefly.
You can customize the message shown in the load mask via signals & slots. When creating a new configurator, the following SigSlo is responsible for showing the default checkout load mask: Checkout.CheckoutStarted -> Configurator.ShowLoadMask('Adding configuration to cart...'):
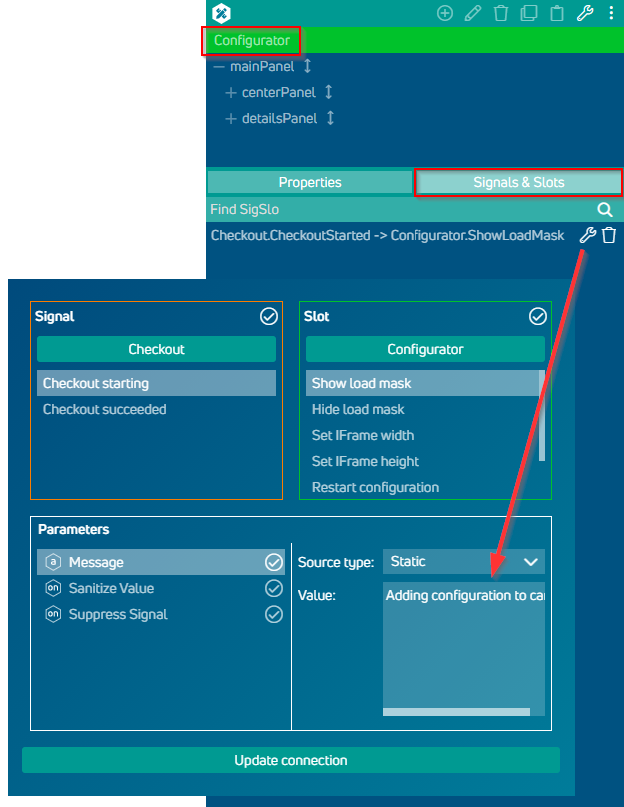
Easy - change text
An easy way to customize the shown message is by simply changing the value of the Message parameter for the existing SigSlo as shown above.
Advanced - Show own UI
If you'd like to show a more advanced UI during checkout, you can also delete this SigSlo, create your own UI and manage showing and hiding of it using the CheckoutComponent's Checkout started & Checkout succeeded signals.
Confirmation after checkout
If you want to hide the load mask after a checkout has succeeded (e.g. after the mail has been sent), you can do this with signals & slots. Simply by using the CheckoutComponent's Checkout succeeded signal and the configurator control's hide load mask slot. Or you can also show your own UI with some confirmation using the CheckoutComponent's Checkout succeeded signal.
Continuing configuration after checkout
If needed, you can keep the configurator open for further configuration after the checkout. A new configuration will be started automatically to protect the checked out one from any modifications. This change is completely transparent and should not be noticed by the user. When this new configuration is checked out, it replaces the previous one.
You only have to manually hide the load mask using the CheckoutComponent's Checkout succeeded signal.
Was this article helpful?