- Print
- DarkLight
We highly recommend utilizing our free Shopify app if you wish to sell customizable products online through your Shopify shop. The app offers a smooth integration between the configurator and the checkout process of your Shopify shop.
Setup
To get started, some simple steps must be performed on the Combeenation platform and Shopify shop.
Combeenation platform
- Create a configurator on the Combeenation platform
- Set up a new Shopify shop in the configurator editor. (see Checkout section for more information)
- Adapt the prefilled JSON (for more information regarding the JSON, see this section)
new ShopifyParameter {
  products : [
    // (mandatory) at least one product must be defined
    new {
      main : new {
        productId : "123456", // Existing Shopify SKU or new one
        quantity : 1,
        price : 99.99, // net price of the configured product WITHOUT accessories.
        imageUrl : "Assetbundle1.MyImage.url", // url to the image which will be used in the cart
        title : "My coffee mug", // new title of the product
        productText : "My product text", // new description of your product
        weight : 10, // (optional) Weight of the main product
        weightUnit : "KG", // (optional) Supported weight unit values: KG, G, OZ, LB.
        categoryId : 126,  // (optional) Category id of the new product, list of all ids can be found here: https://help.shopify.com/txt/product_taxonomy/en.txt
        customFields : [ // (optional)
          new {
            id : "model", // unique identifier
            label : "Model type",  // label which the user will also see in the cart (if it is visible)
            value : "espresso",  // value of the custom field
            position : 1, // position in the cart
            //isVisible: true // if it should be visible in the cart (default: true)
          },
          new {
            id : "productionId",
            label : "Prod id",
            value : "DLU-128120-HR",
            position : 2,
            isVisible : false
          }
        ]
      },
      // (optional) additional predefined Shopify products which will be added to the cart (no custom price/image/title)
      accessories : [
        new { productId : "987654", quantity : 1 },
        new {
          productId : "456789", // Shopify sku
          quantity : 2
        }
      ]
    }
  ]
}
JSON creation with Custom JS
There are certain scenarios where the creation of the JSON in Hive is limited. For example, a dynamic list of accessories may be cumbersome to implement with the current Hive feature set. For these cases and any other custom scenarios, you can create the JSON with Custom JS.
Combeenation offers JS typings to assist during the development process and minimize typos and errors (e.g. incorrect property names). A sample of custom JS code can be seen as follows:
const selectedAccessories = /** @type {Accessory[]} */ (CmpUtils.getCmpValue(CmpNames.SelectedAccessories));
const checkoutJson = /** @type {Cbn.CJS.ShopifyCheckoutJson}*/ ({
  products: [
    {
      main: {
        productId: CmpUtils.getTextCmpValue(CmpNames.SelectedProductId),
        quantity: CmpUtils.getNumberCmpValue(CmpNames.SelectedQuantity),
        price: CmpUtils.getNumberCmpValue(CmpNames.SelectedProductPrice),
        customFields: [],
      },
      accessories: selectedAccessories.map(x => ({
        productId: x.id,
        quantity: 1
      })),
    },
  ],
});

CmpUtils.setCmpInput(CmpNames.ShopifyCheckoutJson, checkoutJson);
Validate JSON
In Hive the Shop type provides a function for validating the JSON (for both Text and Object-based parameters). We highly recommend using this function, because it allows you to quickly find problems in the JSON structure:
ShopifyShop.Validate(ShopifyCheckoutJson)
Shopify shop
- Install the Combeenation app from the Shopify app store
- Go to "Apps -> Combeenation Configurator App -> Configurators"
- Add your configurator
For more information, see this section below.
Usage details
Products
- You can add one or multiple configurable products to the cart.
- The plugin will check the SKU before adding it to the cart
- Existing SKU: the existing product (with all its predefined parameters like price, title, ...) will be added to the cart
- New SKU: The app will create a new product with the custom properties defined in the JSON. Those products will be cleared up after some time or if the order was successful.
- With
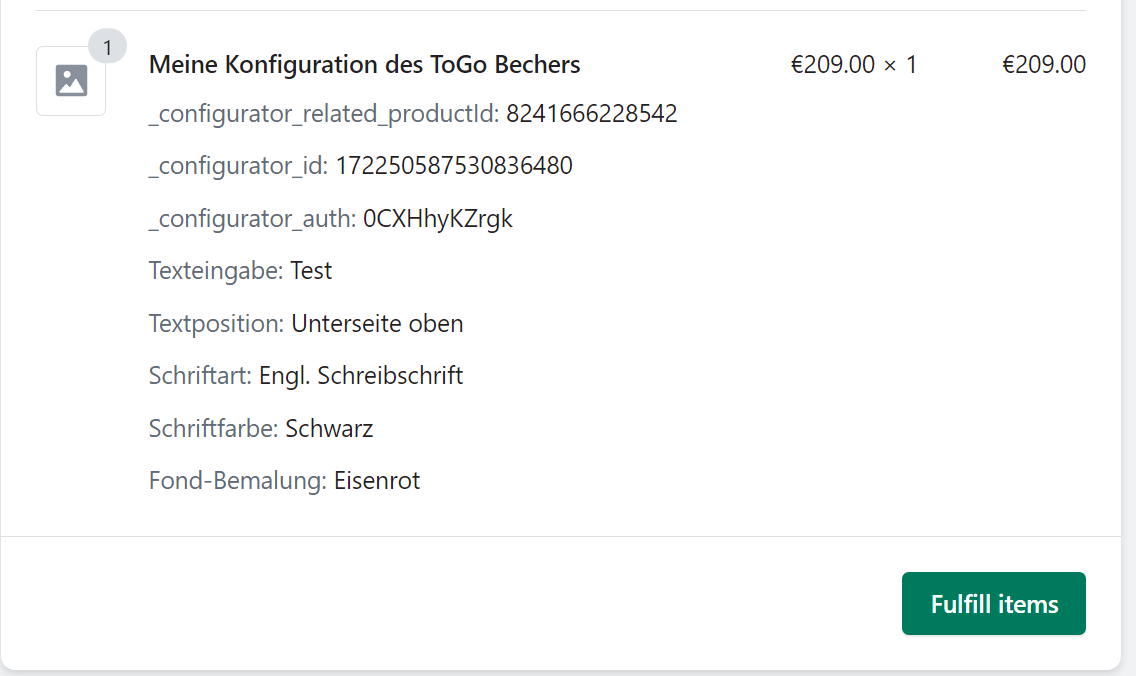
customFieldsown properties can be defined and pushed to Shopifyid... should be unique and can be used for further processing via Shopify/API/ERP/CRM systemslabel... display name of the custom field the user sees in the cart (if visible is true)value... is the value of the custom fieldposition... defines the position of the custom field in the user cart- Visibility: Custom fields can be hidden by prefixing the
idandlabelwith_(e.g._myHiddenField)- Visible fields can provide additional info to the user (e.g. selected model/color/...)
- Invisible fields can be used for further processing data in Shopify or via API (e.g. internal technical information, IDs, ...)
- Both kind of custom fields are later accessible in the backend in the order overview:
Prices & tax
- There is currently still an extra price property in the Shopify shop (similar to the other shop types). It will be used for the dashboard metrics, it won't be transferred to the Shopify shop.
The one who builds the configurator has to display the price correctly. This means it has to adhere to Shopify settings.
Usually Shopify adds the tax only during checkout, this means there are two options for those who build the configurator:
- Displaying the user the gross price in the configurator, but passing the net price to the Shopify app, in order to let Shopify add the tax during checkout
- Displaying the user the net price in the configurator and also passing this info to the Shopify app. In this case the user should be informed that the price is without taxes.
Accessories
- Accessories are usually products in the Shopify shop the user wants to add to the cart alongside with the configuration
- Accessories product price will be retrieved from Shopify
- Accessories are always standalone items in the cart. Bundles are not support in Shopify (in contrast to the Shopware shop)
App configuration
General
The app configuration is used to define the dimensions of the iframe and properly configure the app and configurator base URLs.
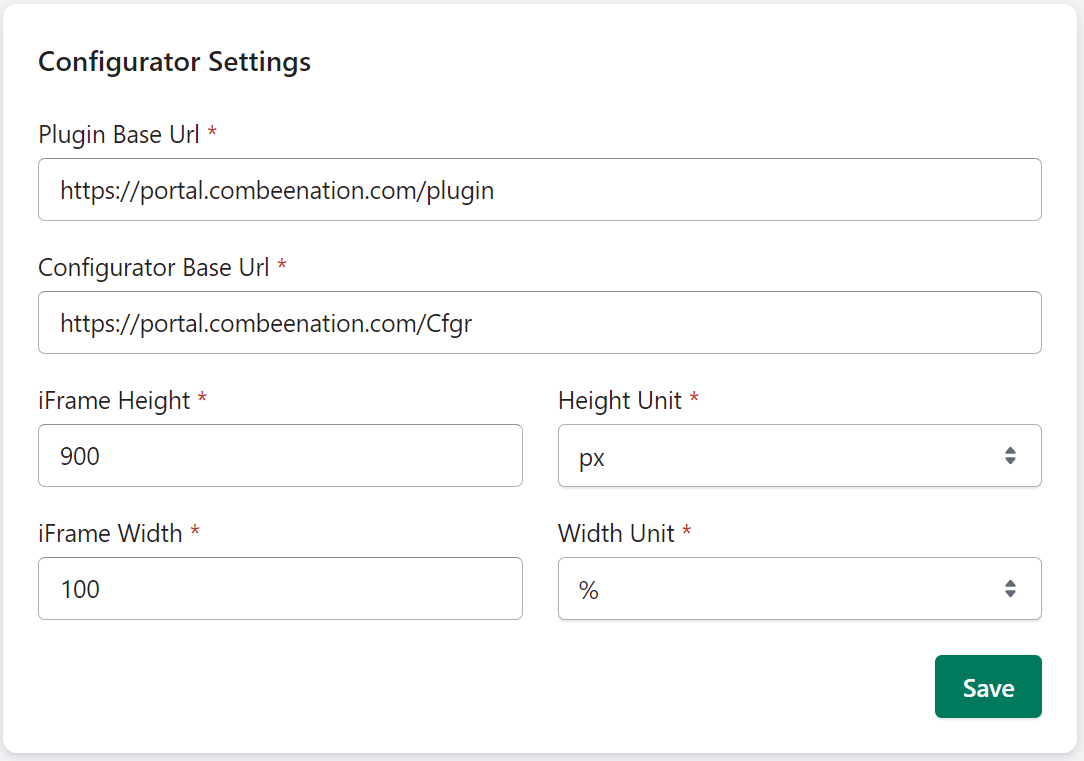
App settings includes the following configurations:
- Sales channel selection
- iFrame width + unit for product detail page
- iFrame height + unit for product detail page
- Plugin base url:
https://portalcombeenation.com/plugin - Configurator base url:
https://portalcombeenation.com/Cfgr
Configurators
Within Combeenation Configurator App -> Configurators you can create and manage configurators for your Shopify shop.
Create new configurator
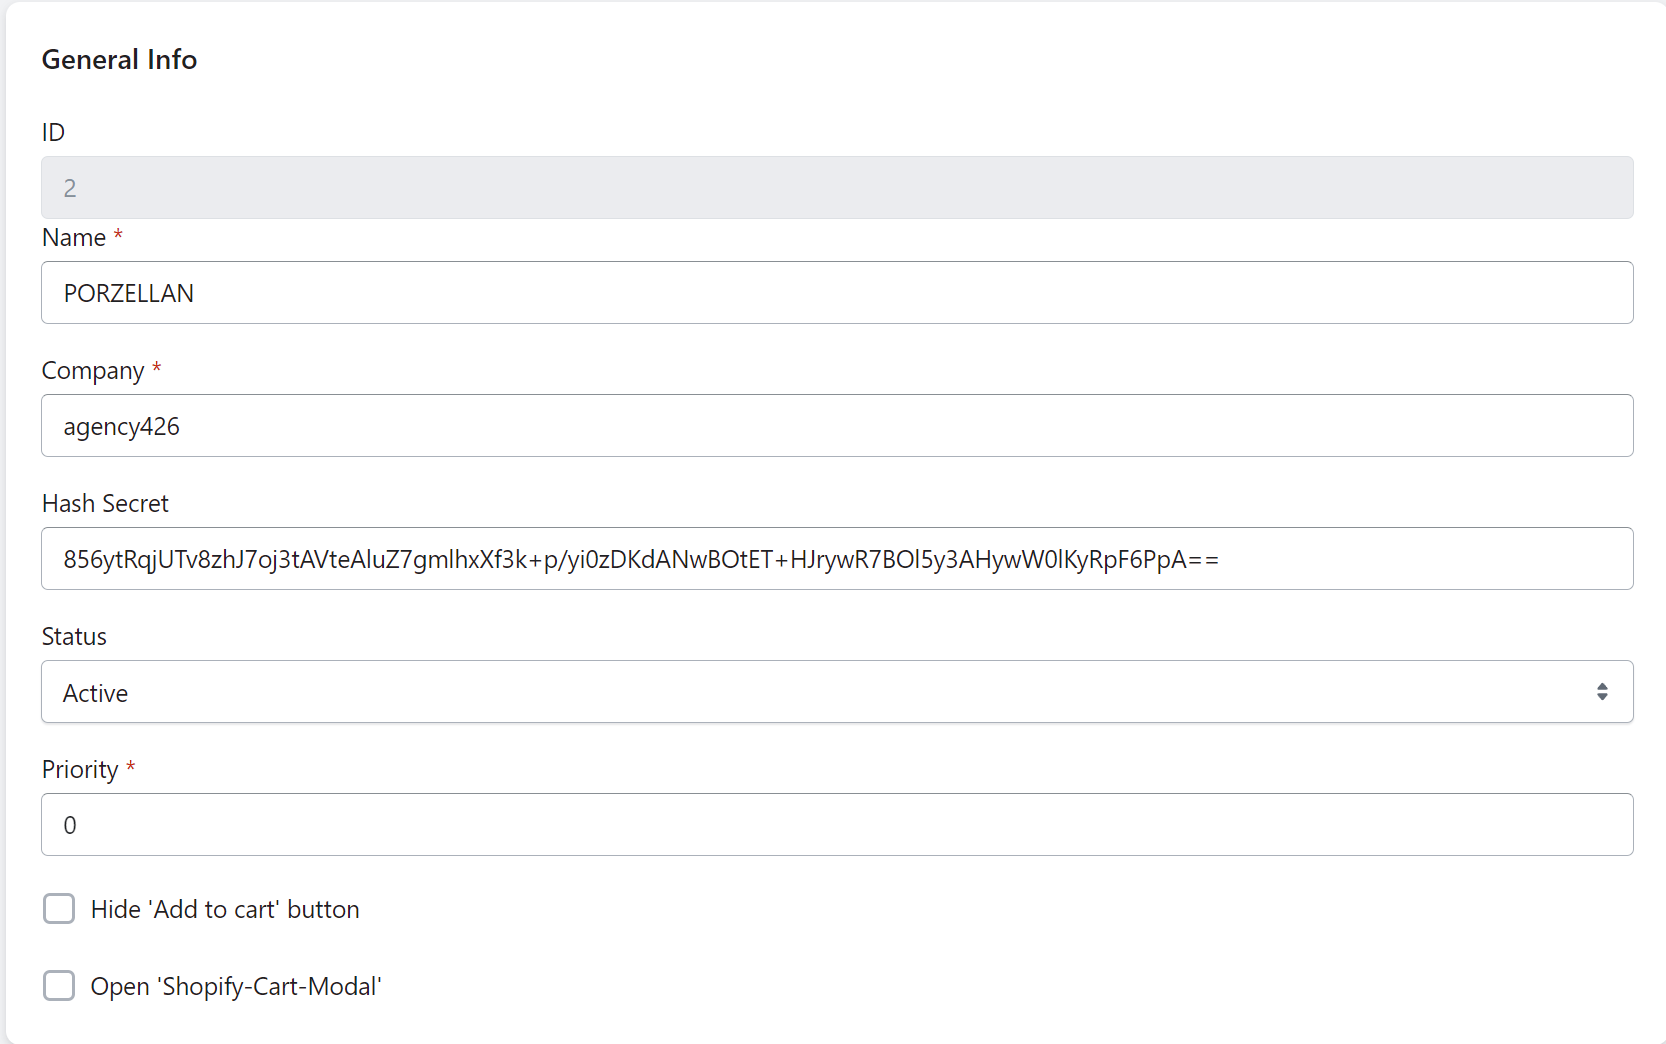
Each shop can be configured with unlimited configurators. These can all be individually customized.
- Id: Will be generated upon creation. The app block requires this id.
- Name: Please enter the name of the configurator you’ve created in the Combeenation Platform
- Company: Please enter the company name according to Combeenation Platform. The company name is part of the iFrame Url
- Hash Secret: Please enter the hash secret according to Combeenation's specifications. The hash secret is part of the iFrame url (leave blank for 3D/AR viewer)
- Status: The configurator can be enabled or disabled for this product
- Priority: Product configurator display is done according to the highest priority (so you don’t need to remove your product from another configurator, instead you just set the priority higher, and then only the settings on the one with a higher priority count)
- Hide "Add to cart" button: Hide the button on the product detail page
- Edit products: Here you can select the products which should be assigned to this
configurator. You can select as many as you’d like.
Advanced configuration
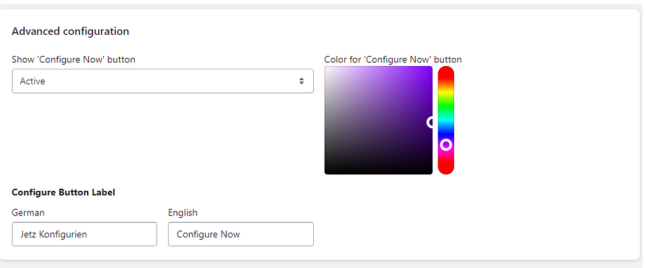
You are able to replace the Add-to-cart button with a customizable Configure Now button.
It offers the flexibility to customize the button's label text and color to match the shop's design language seamlessly.
Configurator Embed Block
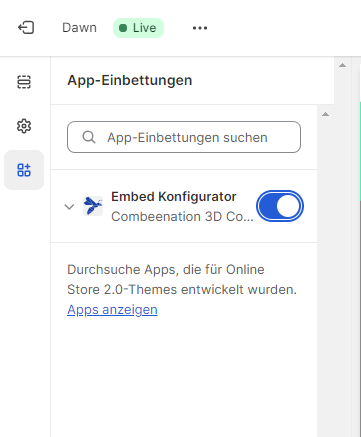
If you are using an Online Store 2.0 theme, then you have to enabled the Configurator Embed Block, in order to have the plugin to work in your shop.
To enabled the Embed block, you can go to the theme editor, click on the third icon on the left and then enable the “Embed Configurator”block
Configurator Block
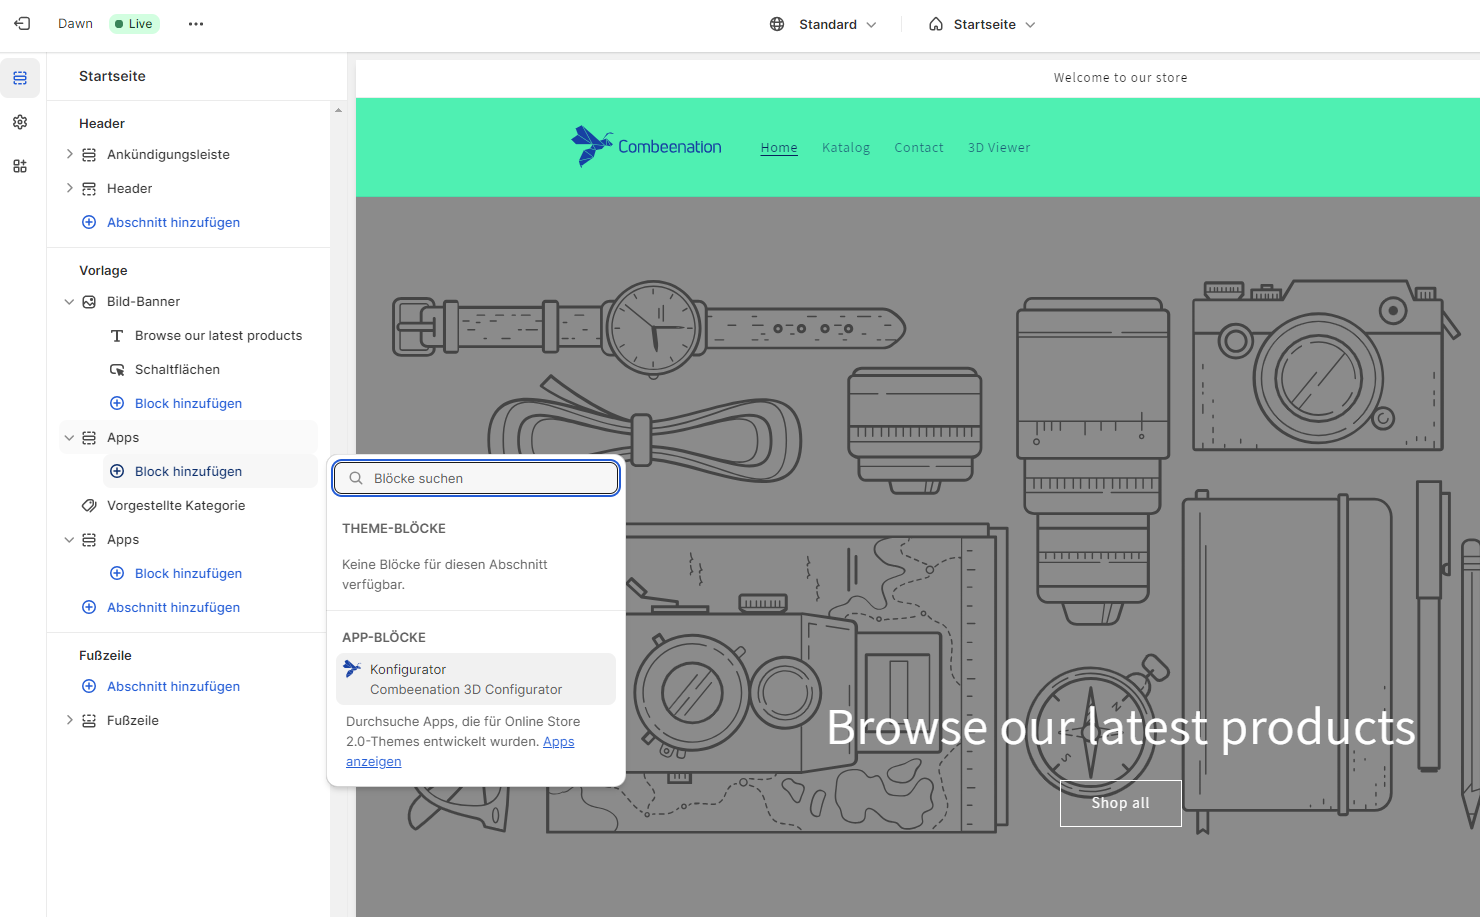
A new configurator-block can be added by going into the Theme-Editor and adding a new section where under “Apps” a block with the name Configurator appears
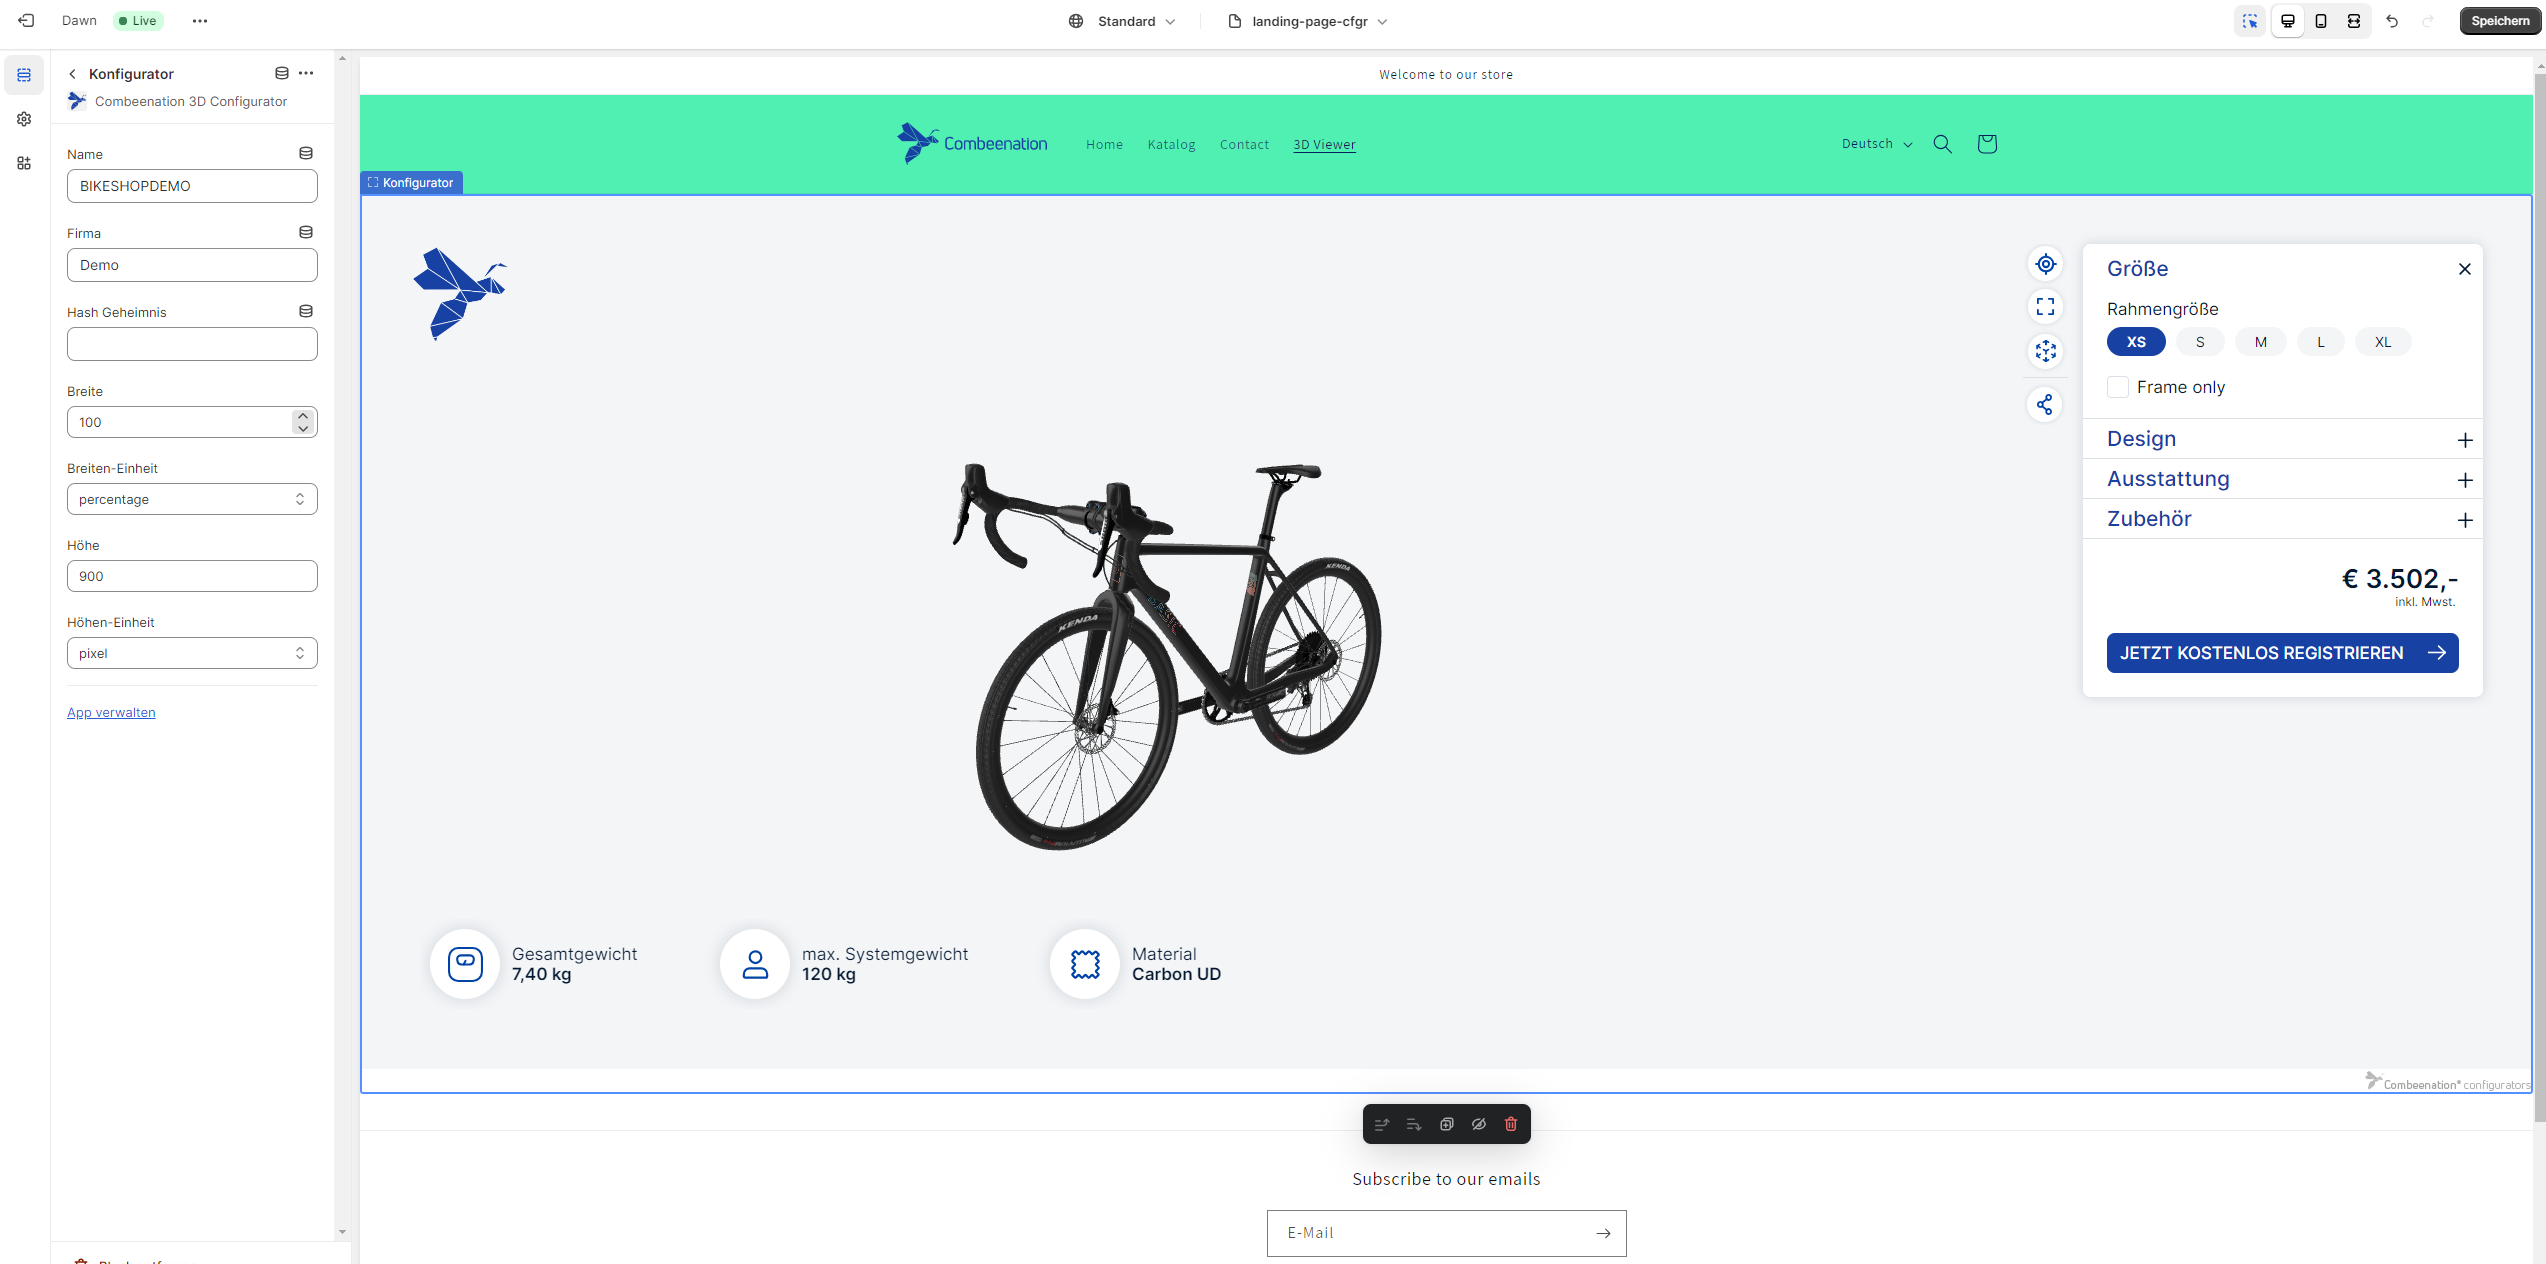
The rest of the process is similar to the general settings, the only exception being that height and width can be set on a per block basis. Another thing worth mentionning is that there can only be one block per page, as otherwise the settings of the blocks can cause problems.
Product Page
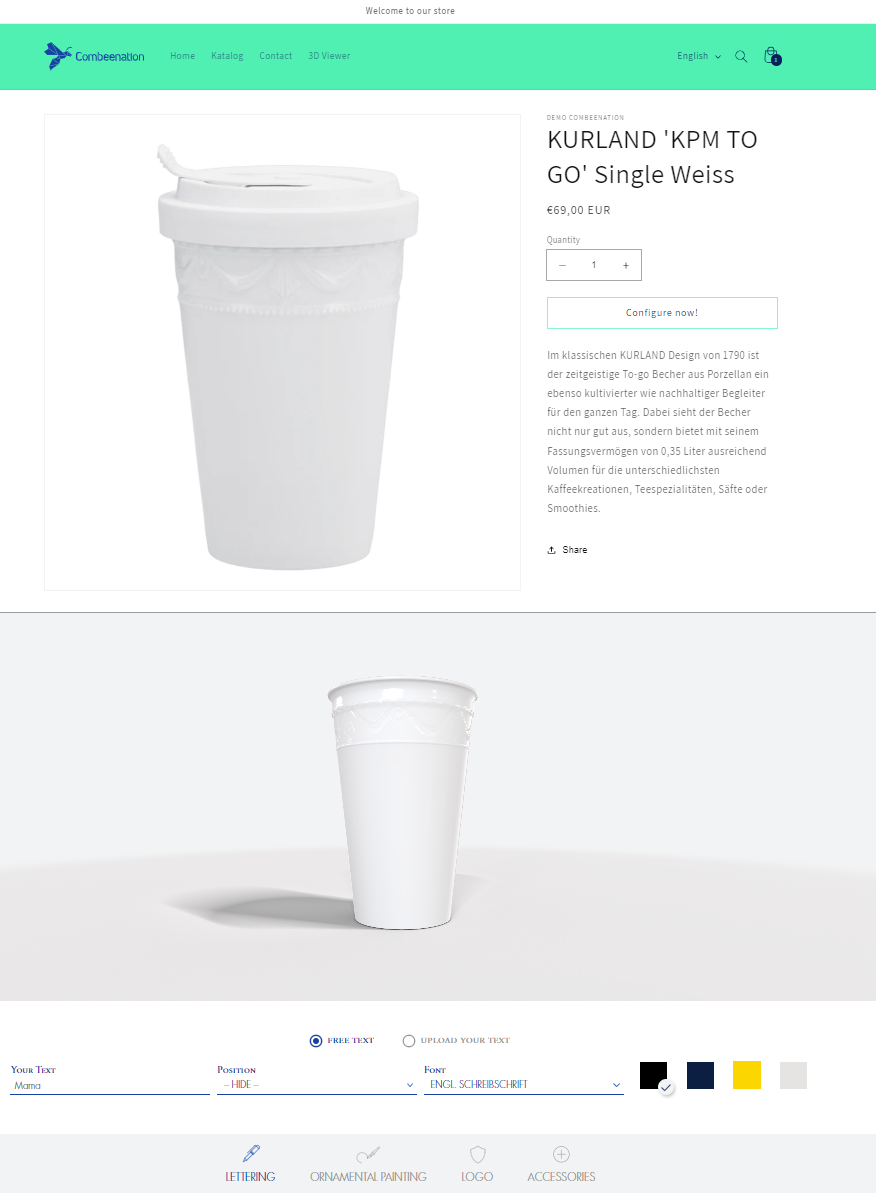
On the product page, the Configurator will appear below the Product. Once the product has been added to the cart using the configurator, it automatically redirects the customer to the cart, adding the custom products and any additional products in the process.
Miscellaneous
- Hide Products
- The App creates each item created in the Configurator as a Product in your Shopify shop and then deletes it after the checkout process is completed and an order has been placed. If the customer doesn’t end up buying the product, it will be deleted after a fixed amount of time automatically. If you want the products to be hidden you need to modify the collections to exclude the products of type
COMBEENATION CONFIGURATOR SURCHARGE PRODUCT.
- The App creates each item created in the Configurator as a Product in your Shopify shop and then deletes it after the checkout process is completed and an order has been placed. If the customer doesn’t end up buying the product, it will be deleted after a fixed amount of time automatically. If you want the products to be hidden you need to modify the collections to exclude the products of type
- Theme Compatability
- Due to a limitation in the Shopify design guidelines, it is impossible to validate the compatibility will all Shopify themes.
Import data into Combeenation
To import data from Shopify into the Combeenation platform, follow these steps:
- Obtain API Access Token: Generate an admin or storefront API access token in Shopify by creating a custom app.
- Create JSON data source asset: Create an asset bundle with a JSON datasource that the workflow updates manually or on a schedule.
- Set Up Workflow: Configure a workflow in the Combeenation backend to retrieve data from the Shopify GraphQL endpoint.
Obtain API Access Token
In order to get the an API access token follow the Shopify guide to create a custom app. After you have created the app, the admin API access token will be displayed once, store it securely, this token is later required for the workflow.
You can also use the storefront API access token to interact with the storefront API. However, be cautious, as this API primarily provides publicly available data and may not include all the information you need. It might not be sufficient for all use cases.
Create JSON data source asset
In order to use the data from Shopify in your configurator, you have to create a JSON data source asset. If you have no experience with assets, see Getting started with assets first.
If you have an asset bundle, we recommend the following steps:
- Install GraphiQL explorer in your Shopify shop
- Open the GraphiQL and construct a GraphQL query with the necessary information about your products. Example GraphQL query:
{
  products(first: 250) {
    edges {
      node {
        id
        title
        productType
        infoArea: metafield(namespace: "custom", key: "info_area") {
          id
          key
          value
          namespace
        }
        variants(first: 1) {
          edges {
            node {
              sku
              inventoryQuantity
              price
            }
          }
        }
        images(first: 1) {
          nodes {
            url
          }
        }
      }
    }
  }
}
- The explorer should now show you the resulting JSON, store this as a file
- Upload the file to your asset bundle as a file asset and assign a clear, descriptive name (e.g.
ShopifyProductsExport) - Based on this file asset you can now create one or multiple JSON based data sources (see docs for more info)
- If you have created at least one data source you can continue with the workflow.
Set Up Workflow
The final step is to create a workflow (see docs for more info) that retrieves the product data from Shopify and updates your created asset bundle + configurators.
The workflow sends a POST request to Shopify's GraphQL API. Upon successful data retrieval, it will:
- Create a new draft version of the asset bundle.
- Update the file asset, automatically refreshing all associated data sources.
- If all steps are completed successfully, the asset bundle and linked configurators will be published, providing customers with the most up-to-date data from Shopify.
Here’s an example workflow. Ensure you replace the placeholder data accordingly:
bundleparameter ... needs to configured in the workflow parameter settings<ACCESS_TOKEN>... retrieved in the step above<GRAPHQL_QUERY>... retrieved in the step above<SHOP_NAME>... name of your Shopify shop, can be found in the URL (e.g.https://<SHOP_NAME>.myshopify.com)<FILE_ASSET_NAME>... retrieved in the step above (e.g.ShopifyProductsExport)
import { bundle } from "@workflow/parameters";

export function run() {
  const requestConfig = {
    headers: {
      'Content-Type': 'application/json',
      'X-Shopify-Access-Token': '<ACCESS_TOKEN>' // header name vary for storefront API
    }
  }
  const content = {
    query: "<GRAPHQL_QUERY>"
  };

  // 1. try to retrieve the data from Shopify admin API endpoint (url + header name may vary for storefront API)
  return http.post('https://<SHOP_NAME>.myshopify.com/admin/api/2025-01/graphql.json', JSON.stringify(content), requestConfig).then((response) => {
    // 2. create a new asset bundle draft based on the asset bundle parameter
    return bundle.createDraft().then((draft) => {
      // 3. get the file asset which should be updated
      const fileAsset = draft.getAsset("<FILE_ASSET_NAME>");
      // 4. update the shopify file asset
      return fileAsset.update(response.data).then((_) => {
        // 5. publish the asset bundle draft & all configurators
        return draft.publish((_) => {
          return true;
        });
      });
    });
  })
    .catch((error) => {
      printError(error);
    });
}

function printError(error) {
  console.error("Error occured: " + error);
  console.debug("Url: " + error.url);
  console.debug("Message: " + error.message);
  console.group("Start printing error response");
  printResponse(error.response);
  console.groupEnd();
}

function printResponse(response) {
  console.log("Status-Code: " + response.status);

  console.group("Start printing headers...");
  for (const key in response.headers) {
    console.log(`${key}: ${response.headers[key][0]}`);
  }
  console.groupEnd("Printing headers finished.");

  if (response.data !== undefined) {
    // `url` returns the URL of the retrieved data
    console.log("Data URL: " + response.data.url);
    // `raw` string is only defined, if data is smaller than 1MB
    console.log("Data Raw: " + response.data.raw);
  }
}
Potential Pitfalls
- The GraphQL API has an upper limit of 250 entries, if you want more you have to use pagination in your workflow


